Posts

Showing posts from November, 2017

My little spice jar

Image
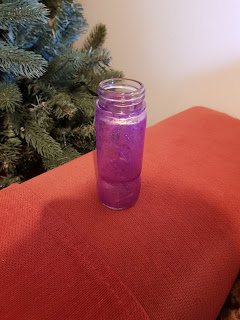
Good Evening! Busy day here again today, I have had time to decorate this little spice jar I cleaned once it was empty. I haven't decided what will fit inside it yet. If you have any suggestions, drop me a comment. So once the jar was clean and dry, I painted it using Cosmic shimmer lustre paint and a sponge. Again once this was dry I could start decorating. So to start I used some pink ribbon and glued it around the jar using Collall all purpose glue. It's really strong adhesive. Then I decided to use some flowers for decoration, the flowers I use are Craft box flowers. This was the first time using them and I must say, the white ones I used, take colour very well. Also my wink of Stella pen was used.(LOVE IT)  So to colour I used my pink Spectrum Noir pink sparkle pen, I scribbled it onto my acrylic block and added a spray of water to it. I painted this onto each white flower and dried them. My wink of Stella glitter pen was then brushed over each dr

Getting ready for Christmas

Hello to you all, To start up our festivities the tree has been put up today. It's not decorated but it is up and the branches arranged until I was happy with it. Unfortunately I was unable to take part in WOYWW today as I have barely had a chance for a cuppa all day until now. I must say I'm happy to be sat on the sofa chilling now. I plan to TRY and fit some crafting in tomorrow and will post some pics of my efforts. Thank you for spending some of you day with me. Crafty hugs and see you tomorrow! Ellie x

Squeezing in crafting

Image
Heeey! So today has been utterly chaotic. So here is a couple of things I managed to squeeze in. The first one is the start of a journal page, the background is done using blue and cream raffia. Then in the gaps I stuck some mop up wet wipes which match the colours I have in mind. The Jack Russell image is from some junk mail. I have a JRT and love them, this page isn't finished but I plan to crack on with it tomorrow. The second and final item I started was this colouring book page, I will trim it down once complete. Thank you for spending some of your day with me. Crafty hugs and see you tomorrow for WOYWW. Ellie x

Pretty background, simple foreground...

Image
Happy Monday everyone! So for today's card topper I used a background I made in a previous blog post. So first I wanted to back my card topper onto a patterned paper. I chose a pink and purple design from my 'wild flower ' paper pad. I adhered my background to the paper using double sided tape. Next I selected a silhouette fairy stamp set I got gifted by a friend. I used the field wildflower strip along the bottom, I only needed to stamp it twice to achieve this. I used archival black ink for all my stamping. Then finished up with stamping the Fairy, fairy dust and sentiment. This is a rather generic sentiment so could be used for a birthday or thank you card. To complete my super fast card I used my Nuvo crystal drops in a pale pink, I used it on the top corners of my completed topper. Thank you for spending some of your day with me. Crafty hugs and see you tomorrow! Ellie x

A junk journal I made fairly recently...

Image
Hello friends! So today is mainly a photo filled blog but I wanted to show some of you that haven't seen, the first junk journal I made. I am really happy with it now it's complete but I haven't got round to writing in it yet. Please leave a comment and let me know about what you put in your journals and what you think of mine. Thank you for spending some of your day with me. Crafty hugs and see you tomorrow! Ellie x

Birdy art journal page step by step

Image
Hello to you all! So today I am going to share a step by step with you, of an art journal page I completed yesterday. To start I ripped up some old book pages into strips, I then applied them to a piece of cardstock using Matt mod podge. Once dry I trimmed the edges to tidy it up. Next I got my stamp set by Graphic 45, called 'midnight masquerade ' I only used the border stamp which has flourishes. I stamped this across my piece using memento dew drop ink in green and also Artistry ink in green. To add some more texture and shimmer I applied a small blob of Cosmic Shimmer Lustre paint, in green to a stamping block. I added a little bit of water to this and using a paintbrush I flicked it at my page. Next I cut out a bird I found in an old book and fussy cut him out. I thought his colouring matched the page perfectly. I stuck him down and covered him with glossy mod podge. Finally I stamped the word 'Magical' using Archival black ink, twice on the pa

Advent Calendar all done! Yay!

Image
Evening friends! My Christmas advent calendar is now finally finished, yes it took ages haha! The snowman is stuck into the snow on the ground now, so it is all ready to fill with treats. I managed to get a journal page finished today also and will show a step by step tomorrow. I would like to thank all those that left lovely messages on Wednesdays blog post. It is very kind of you all. I look forward to seeing you tomorrow for the step by step. Thank you for spending some of your day with me. Crafty hugs and see you tomorrow. Ellie x

Advent calendar nearly finished

Image
Good Evening friends. A quick post tonight, I just wanted to share my almost  complete advent calendar. The trees I decorated in a previous post have now been attached to the advent using a hot glue gun. In addition to this, my partner decided it was missing something before I put the snowflake paste on the ground. He grabbed one of my mdf shapes and starts to colour it. He then handed me this little snowman. I can't deny he is cute. So using my snowflake paste by Prima, I spead it around the base of the trees and pressed the little snowman into it. I shall show finished photos of the snowy scene tomorrow. I hope you are all having a good week! Thank you for spending some of your day with me. Crafty hugs and see you tomorrow! Ellie x

WOYWW-442 - 22.10.17

Image
Hello friends! Thank you to all of those who have visited me since I joined WOYWW. If you would like to join in with this lovely group of crafters, or look at some other desks, visit the hub of activity here. My desk isn't too bad this morning, last night was a different matter all together. I had paint EVERYWHERE! I don't know how but I just managed to cover myself, my clothes and the carpet...Oops! On my desk today are some bits Ive been using to make tags with. The ones in the pic aren't Christmas ones. The little jellyfish are super glittery but the camera wont pick it up. These little Jellyfish toppers will be mounted onto tag bases once I die cut them. I have been loving my tonic dies for making tags lately. They are fab! Have a fantastic day everyone! Thank you for spending some of your day with me. Crafty hugs and see you tomorrow. Ellie x

Trees and tags

Image
Evening to you all. I have been spending the evening making more batches of tags for the Craft fair in December. I am having good fun making some tags that aren't Christmas related too! This is going to be the centre point on the front of some more tags. These are the generic ones to be used year round. I used my 'wink of Stella clear glitter pen on top of the jellyfish image. It's so sparkly but I don't think the camera has really picked it up. Everyone needs a glitter pen like this, I love mine. The stamp set used on this centre piece is 'so jelly by lawn fawn and 'tiny sayings ' by Lawn fawn also. Such cute little sets. Yesterday I recieved my order from Anna Marie designs. This was my trees to finish off my advent calendar. So I have painted them with green acrylic paint. This step was incredibly messy, I don't know how but I ended out with paint on my neck, face and clothes. Once painted and dry, I applied Super thick slap it on ( Indigoblu)

Penguin gift tags

Image
Good Evening ( I think it's a bit late in the night to still say that). So today has been utterly chaotic which is why today's blog is up so late. Today I also agreed to take part in a craft fair to raise money for The Hospice, so I have lots of making to do before the fair date rolls around. So to kick start it all, I have made a batch of penguin Christmas gift tags. To begin I stamped one of the penguin stamps from the stamp set by Mama Elephant. It's adorable! I used memento black ink for this. I then used a post it note to create a mask for the lower half of the penguin. I applied the mask to each penguin one by one and stamped the ice piece over the mask. This gives the effect the penguin is in the front.  Next I used the Tonic tag die set pictured below and die cut the penguins using the ribbon threaded style die from the set. I love this die, something very different. Next I used my Gelly roll sparkle pen to colour in the ice skates. My die cutting machine

Playing around making backgrounds..

Image
Hello !! Today I spent the afternoon having a mess around with a few products and made a couple of backgrounds. For the first background I used three of my cosmic shimmer paints, I put a small blob of each and used the brayer making the colours blend. The shimmer in these paints is gorgeous!! Using the brayer I applied the paint across the page, I don't want perfect coverage as I wanted some interest in the background. Its not visible in the photo but shimmer is so beautiful. Then I used my Tim holtz scissors and fussy cut some flower and butterfly images. I adhered these with my collall glue, its super strong . For my second background I used a stamp set by Clarity and used one leaf stamp . I stamped this single stamp image using Memento dewdrop ink pads in pink and purple. On some of the leaf impressions I used both ink pads at the same time to create a different effect. I stamped the leaf all over my card panel and I really like the finished result, its pa