Posts

Showing posts from 2020

WOYWW 600!! woohoo!!

Image
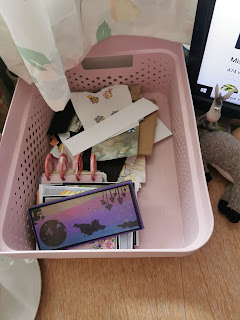
 Good morning lovely, crafty friends! It's week 600 of WOYWW! Absolutely fantastic collection of crafters and desks, seriously head over to the Stamping ground HERE to get involved. We are a friendly bunch, honest! Unfortunately I wont be able to take part in the zoom meet up today, because of therapy. I trust you will all have a good giggle. Really thrilled to be part of this crazy group and so pleased to see the 600 milestone get smashed!  So on the topic of desks, here is mine ... You know all those Christmas elements I stamped, coloured and fussy cut. I didn't use a single one on my cards. What a plonker! Decided to pop one inside each card instead as an extra detail. So my cards are finally finished and now to write them all out. Then onto making some little boxes for bath bombs I am gifting to a few friends. So the hounds, they both got bought a coat the other day, as its getting chilly. They look awfully posh now and seem to enjoy having them on too!  Since its Lyrax'

WOYWW 599!!

Image
  Good afternoon crafty friends!! Time for some more sharing of desks, my favourite part of a Wednesday! To join in with this kind community head over to The Stamping Ground, run by the lovely Julia. So above is my desk currently, just decided to light a candle, since this time of year is perfect for it. I adore candles and have been loving burning them as the nights draw in. Anyone else a candle addict? So also on my desk is a Greggs cappuccino I grabbed this morning as I needed to pop into work at 7:30am. Far to early to be expected to function ! There's a selection of stamped, coloured and fussy cut Christmas images, these will be used in my Christmas cards. Some friends have already made theirs and are posting them today, that most definitely makes me panic! Everything seems to be creeping up so fast and I am not even ready, however I am glad I will be able to spend my birthday and Christmas with my family. I hope you will all be able to do the same too. So quite a few of you m

Feeling a bit glittery ~

Image
 Good morning crafty friends!! So today I just wanted to make a quick post to show a birthday card I've made. Its for a close friend of mine and I really enjoyed making it. I used my Glitter magic glue and glitters to add sparkly within the die cut design. The photo doesn't really catch the sparkles but its really pretty. I hope you are all well and staying safe, this time of year is hard for many, never mind with a pandemic on our hands. Stay safe and take care! Thanks for spending some of your day with me! Ellie x

WOYWW - 598 - Christmas

Image
  Good Morning lovely crafty friends,  thank you for the kind comments last week.  To join Julia and this amazing nosey desk searching blog writing weekly chatting crafty community, head over by following this !!! So, oh yeah my desk, from left to right, comp screen remote, pop paperclip off my planner, my pupper keeps pulling it off. My planner underneath the stack , then lots of Christmas stamps. The other day I stamped a load and coloured them, these still need to be stamped so were dumped on my planner. Finally on the right is my cuppa. At the top you can see a webcam and some Pebeo paint, I came home to find my other half using said paint, shocked doesn't cover it. Not much going on to be honest, still working. Although last night was interesting, my OH just finished eating his tea and decided to play with the pupper while I finished mine. Lyrax got so excited he leapt into the air, landed on me, which smashed my dinner plate and threw my tea all over the floor. Well...I didn&

WOYWW - 597 - KABOOM!

Image
 Good morning crafty friends! Firstly I want to apologise for now visiting many on my last post, things went badly that week, so I am sorry. For those who want to visit other desks, be sure to click here ! My desk  has exploded...  See, I told you ! So I've been making a journal from scratch, its for my managers daughter. I made the binding and everything inside too. She loved it , so I am thrilled to bits. I will be spending this afternoon tidying up. The most important thing is that I have made a space for my cuppa to sit. So I hope you are all well and staying safe in lockdown #2 for those in the area. My OH finally managed to collect our wardrobe insides from Ikea, so we will be sorting through all the clothes we own. I am working throughout lockdown as I work in an essential store. I am knackered to say the least, I hope you all are staying safe.  Thank you for spending some of your day with me! Ellie x

WOYWW 594 - Okay..I have a problem

Image
 Good afternoon crafty friends,  I didn't take part if last week's WOYWW some of you may have noticed, I was going through some difficult things so didn't have the energy.  To take part with Julia at The stamping ground click here! It will be photo heavy this week but I need to show you all something, which will force me to organise it all. The first pic below I wanted to share the container I got from Ryman for a good price. I bought it to keep backgrounds or unused elements, along with completed cards. Okay, I think I am obsessed with G45 so thought I would share my "small" collection before I organise it all. Hold onto your bums! Well if you got to the end without having a heart attack , well done! It needs a good sort through. The box on the left is a Graphic 45 tag box which I plan to decorate with said tony collection. I hope you are all well and I look forward to scrolling through and nosing at your desks and creations. Any tips of how I can organise the p

WOYWW 592

Image
 Good Morning Friends Happy WOYWW! So today, my desk is a tad empty. Yesterday there was no room to move as I had finished the advent swap envelopes.  So I had a trip to Bristol so popped into Hobbycraft to grab a few things, one being this pack on pretty coloured cardstock. I have also been playing with some more acrylic pouring, this was a dirty pour using the left over paint I had from making a gift. I use the spotty paper cups to pour the paint. I just wanted to apologise that I do take a few days to catch up, on reading your lovely blogs. I hope you don't mind as I like to relax with a cuppa and have a read of a few each day. Speaking of a cuppa I am enjoying a coffee right now, ready to start the day. If you want to join in with this desk madness, head over too The Stamping Ground! Thank you for spending some of your day with me. Ellie x

WOYWW 591 - STICKER EXPLOSION

Image
  Good Morning! Well I don't know how its Wednesday already, but here we are! Nip over to The Stamping Ground if you enjoy snooping at other desks, just like me. So this week my desk looks like a disaster, not sure where to start with it to be honest. So front and centre is my A5 Filofax planner. To the left is a stack of stickers and stationery goodies. On Sunday was an online event a friend and I organised for the planner community. It went really well and I am thrilled to bits everyone who took part enjoyed it. Head over to The South West Planner Club on social media if you are interested in next years event at all. Today is filled with appointments as usual, after I plan to get some cards made for family birthdays. I am also taking part in an Advent calendar swap where I make 25 envelopes of crafty goodies, everyone taking part does this and at the end we all receive a full advent , each day an envelope from those involved. I do hope that makes sense.  you may have noticed the

Boo!! Halloween series #9

Image
 Good evening crafty friends! So tonight I wanted to share a simple Halloween card with you all! The cute pumpkins were cut using my Cricut explore air 1. I coloured them using my zig kuretake clean colour real brush markers using a water brush to blend the colours.  After cutting a square from plain white card, I inked it using my cosmic shimmer chalk cloud blending inks. I applied a grey using a blending sponge. Once dry I glued the pumpkins to the bottom half of the card and trimmed off the excess. With a white gelly roll pen, I wrote out the word "Boo!". I accented the word with a glittery gelly roll pen. I adhered this panel to some scrap patterned paper using collall glue. To finish up, this was all glued to a white card base. I'm loving using my new machine I cannot wait to have a proper look at all the SVG cut files available. Thank you for spending some of your day with me.  Ellie x Products: Zig Markers Cricut cutting machine Gelly roll pens Chalk cloud ink Sent

What's on your work desk Wednesday 590

Image
 Good Morning! I hope you are all well and staying safe. It's has been quite some time since I have been able to take part in this weekly tradition. I really have missed it. To take part, or join in aswell, head over to the Stamping ground here . On my desk today, there is a bit of a mixture going on. I'm mid way through a few things and don't have enough time in the day.  There is a canvas that I have recently tried acrylic pouring on. It's great fun! I'm also painting a picture frame for a project I've just started.  I have a collection of cut images in a heap aswell. These are from my Cricut machine and I am loving owning one of these finally. Most of these will be going on cards for my Halloween series.  Thank you for spending some of your day with me! Ellie x 

Grungy - Halloween series #8

Image
 Good Afternoon all! So today I'm sharing a Halloween card I made using some bits I had extra of or were lying around. I searched in my background pages drawer and came across this dark, grunge effect sheet. This was made using water with some distress inks and smearing the colour on against my glass mat. Then from a recent Indigoblu magazine, I selected a stamp that matches the effect I was going for. I stamped it using Versafine onyx black ink.  From some stamped and coloured images I made in advance, I fussy cut some leaf clusters. Seperating each leaf, I arranged them on the opposite corner to the stamping. These leaves were coloured using Zig Kuretake clean colour real brush markers.  I adhered my leaves using collall glue, I chose to make them have the appearance of falling. Finally I backed this topper onto deep Aubergine Cardstock leaving a small border. If you wished to, a small halloween sentiment could be heat embossed on the right side of the card also.  Thank you for s

Acrylic pouring

Image
  Good Evening crafty friends! Just wanted to share my first acrylic pour with you. I've been dying to have a go, so finally took the plunge.  I decided to use pink, blue and white acrylic paints. I grabbed some small canvases from The works store. My cell creator is by Dina wakley, the pouring medium is from craftstash and the acrylic paints are by Pebeo.  To get this effect I poured the colours one at a time on top of the previous, in the centre of the canvas. I added a couple drips of cell creator in the pots holding each colour. Then I tilted the canvas to ensure the colour covered the surface. I left it to dry overnight and I love it so much! Cannot wait to have another play! Thank you for spending some of your day with me.  Ellie x Products: Pebeo Acrylic paint Pouring medium and cell creator Art canvases

Halloween Series #7 - Spooky serum

Image
 Good Morning crafty friends, Today I will share a small but simple card with you all. So from #5 post in the Halloween series, I had some of the purple background left over. I decided to use this in a tiny card idea that struck me. I die cut the slim strip of background 3 times to lattice the whole piece. This then was backed onto black Cardstock.  Using the alchemy stamp set from Sheena, with Crafters Companion. I stamped a potion bottle and coloured it with watercolour. I then cut this out and adhered it to the background. In the same stamp set I used the rustic paper square, cutting it out and colouring after stamping. With a black gel pen I wrote 'Spooky Serum' and glued it to the background also. To finish this little card I used Ranger Glossy Accents on the glass areas of the potion bottle, then left overnight to dry.  Thank you for spending some of your day with me! Ellie x Products: Alchemy stamps Tonic studio dies Glossy accents Collall glue

Crafty Haul from Craftstash

Image
 Good Morning friends! I just wanted to do a quick post between the Halloween crafting, to show you my crafty haul. These goodies I purchased from Craftstash and cannot wait to play with them. Craftstash.co.uk If you have not ordered from Craftstash before, I would highly recommend them.  So this is what I ordered:  Acrylic pouring Fluid, this is added to acrylic paint to change the consistency and make up of the paint.  Dina Wakley Cell Creator, this is added in small amount to the paint before or after pouring. It them makes the paint react, leaving small areas with a visible cell appearance. Dylusions Acrylic paint, I bought these paints in the colours: Periwinkle blue, Mango punch and Tropical sangria. These are such beautiful vibrant paints. Dina Wakley mixed media tags, in this pack there is 5 of two sizes. There are YouTube videos on Dina's channel of her using these tags. Definitely worth a watch! John next door, craft magazine and products set. This box is issue number 63,

Halloween series #6 - Spooky mail

Image
 Morning friends!  This morning I want to share this card with you. As with the last post, this background was made using a Gel press.  I cut a thin panel out of this background, I then embossed it using a Leaf vine die from Crafters Companion. I did this twice, so the panel was all embossed. I have this adorable stamp and coordinating die set from AlteNew called Snail mail. With my Distress Oxide inks, I stamped out the image in greens and oranges. Next die cut each cute envelope and stamped the heart image in black ink on the top flap, of the envelope image. I applied a generous amount of Glossy accents to each heart and left to dry overnight.  In the morning, using collall glue I mat and layered the panel to plain black card stock, then onto a white card base. Thank you for spending some of your day with me! Ellie x Products: Altenew snail mail stamp Glossy accents Distress oxide ink pads Versafine black ink

Halloween series #5 - Gel press background

Image
 Evening friends, So tonight I want to share a card that has a more neutral design. This could certainly be given as a Halloween card though. All of these cards I've created can be altered as you wish to, if you would like to make them more spooky. This background I created using a gel press. I applied Pebeo acrylic paints and moved them around using a brayer. Once dry, I trimmed the background down and backed onto black card stock. I dived into my vast collection of patterned papers and found this cute toadstool print. Using my lawn fawn stitched circle dies, I cut out a circle that would fit nicely onto my background.  The left over black plain card stock, I die cut the Olive tree die from Joanna sheen, also the little star cluster die from Lawn Fawn. To add a little extra sparkle, I brushed over the die cut images with my Wink of stella pen. I adhered these elements to the circle, then the circle foam taped to the background for some extra dimension. To complete the card, this w

Halloween series #4 - bit of blending

Image
 Hello friends, I hope Friday is treating you well! So for this Halloween card I wanted a silhouette effect over a night sky. To begin this slimline landscape card I cut a panel 6.5cm x 14.8cm, out of white card stock. Using a piece of scrap card I cut a sloping hill shape and masking taped either side to my panel of card. For blending I used some foam squares and my oxide ink pads. The first colour blended against my hillside is Seedless Preserves, then above it with Wilted Violet, then above that I used Faded Jeans. I moved back and forward between the colours to get a smooth blend. Once I was happy with the sky colours, I flipped my hillside over to the white area was exposed and the sky was covered. I then applied a light blend of Frayed Burlap to the hillside area.  I then removed the card stock to reveal the sky and hillside complete. using a selection of silhouette stamps by unknown companies, I added archival jet black ink and stamped them using the Tim Holtz stamping platform.

Halloween series #3 - No Halloween stamps

Image
  Hello friends, I hope you are all having a good Thursday!! So I've finally got round to making a card, using the background from the previous blog post. First I grabbed the Lawn Fawn Baah Humbug stamp set, I selected the standing sheep stamp. I stamped it using Archival Jet black ink and coloured three sheep. Also from that set I used the bow stamp twice and coloured both purple. All colouring I did for these card, I used my Kuretake clean colour - real brush markers. Since I don't own any Halloween stamps, I had a rummage in my collection. I found an adorable stamp set by Heffy Doodle called Lucky friends, in this set is a pot of gold. I thought this would make a perfect cauldron, again I stamped two and coloured with my markers. After colouring and fussy cutting my images I glued a black card stock piece to cover the card base. Then I sliced my patterned background in half, I ensured each piece had a small border of the black card showing. I adhered all the card stock and i