Posts

Showing posts with the label tonic studios

WOYWW 649! where is November going?!

Image
  Good Afternoon crafty friends! I cannot believe how fast this year has flown by, its crazy and I am starting to panic. Christmas is going to be here in the blink of an eye. So I've been doing lots of crafting along with all these fab deskers, head over to The stamping ground to check out some other messy desks! In this picture, my empty coffee ...I need to make another :) So front and centre are some MDF baubles that I decorated and sealed, finally adding a ribbon loop to each. (Yes I did burn myself with the glue gun again!) Above the keyboard is my Ipad and apple pencil I use for designing stickers for my etsy shop. Next to those is some finished ATC coins and Inchies, they are being swapped next month.  This is the view of the right side of my desk, on the right are my coaster, then notepad stack. (Im obsessed with stationery)  Inkpad stack, nintendo switch, my washi drawers because I have too many. Also there is another replacement blade for my silhouette cutting ma...

Halloween Series #7 - Spooky serum

Image
 Good Morning crafty friends, Today I will share a small but simple card with you all. So from #5 post in the Halloween series, I had some of the purple background left over. I decided to use this in a tiny card idea that struck me. I die cut the slim strip of background 3 times to lattice the whole piece. This then was backed onto black Cardstock.  Using the alchemy stamp set from Sheena, with Crafters Companion. I stamped a potion bottle and coloured it with watercolour. I then cut this out and adhered it to the background. In the same stamp set I used the rustic paper square, cutting it out and colouring after stamping. With a black gel pen I wrote 'Spooky Serum' and glued it to the background also. To finish this little card I used Ranger Glossy Accents on the glass areas of the potion bottle, then left overnight to dry.  Thank you for spending some of your day with me! Ellie x Products: Alchemy stamps Tonic studio dies Glossy accents Collall glue

Crafty Haul from Craftstash

Image
 Good Morning friends! I just wanted to do a quick post between the Halloween crafting, to show you my crafty haul. These goodies I purchased from Craftstash and cannot wait to play with them. Craftstash.co.uk If you have not ordered from Craftstash before, I would highly recommend them.  So this is what I ordered:  Acrylic pouring Fluid, this is added to acrylic paint to change the consistency and make up of the paint.  Dina Wakley Cell Creator, this is added in small amount to the paint before or after pouring. It them makes the paint react, leaving small areas with a visible cell appearance. Dylusions Acrylic paint, I bought these paints in the colours: Periwinkle blue, Mango punch and Tropical sangria. These are such beautiful vibrant paints. Dina Wakley mixed media tags, in this pack there is 5 of two sizes. There are YouTube videos on Dina's channel of her using these tags. Definitely worth a watch! John next door, craft magazine and products set. This box is i...

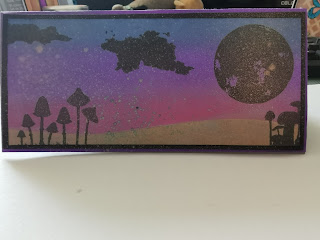
Halloween series #4 - bit of blending

Image
 Hello friends, I hope Friday is treating you well! So for this Halloween card I wanted a silhouette effect over a night sky. To begin this slimline landscape card I cut a panel 6.5cm x 14.8cm, out of white card stock. Using a piece of scrap card I cut a sloping hill shape and masking taped either side to my panel of card. For blending I used some foam squares and my oxide ink pads. The first colour blended against my hillside is Seedless Preserves, then above it with Wilted Violet, then above that I used Faded Jeans. I moved back and forward between the colours to get a smooth blend. Once I was happy with the sky colours, I flipped my hillside over to the white area was exposed and the sky was covered. I then applied a light blend of Frayed Burlap to the hillside area.  I then removed the card stock to reveal the sky and hillside complete. using a selection of silhouette stamps by unknown companies, I added archival jet black ink and stamped them using the Tim Holtz stamping ...