Posts

Showing posts with the label creative

Natures Textures Hexagon - 2 Cards

Image
 Hello Papercrafters, I recently went to the Stamperama in Bridgwater, which is a show filled with stamp vendors. I bought lots of lovely things that I will show in another blog post.  One of the products I purchased was a stamp and stencil set by Angela Poole. It includes 2 stencils and a stamp set with a very arty style. For these two cards I used both stencils and lots of the stamps. Products: Angela Poole Natures Textures Hexagon Set Concord & 9th Paradise Dies Ranger Distress Matte Collage Paste Ranger Distress Oxide Inks : Wild Honey & Ground Espresso Versafine Claire Nocturne Ink Vintage Handwriting Paper   Process: I started this card by just having a play on an a4 piece of thin white cardstock. I used both stencils with Distress Oxide ink in both Wild Honey and Ground Espresso. I applied the ink using a small finger dauber. I moved the stencils around to get a random effect across the page. Then I opened up the stamps, I selected a few of the small flower...

WOYWW 600!! woohoo!!

Image
 Good morning lovely, crafty friends! It's week 600 of WOYWW! Absolutely fantastic collection of crafters and desks, seriously head over to the Stamping ground HERE to get involved. We are a friendly bunch, honest! Unfortunately I wont be able to take part in the zoom meet up today, because of therapy. I trust you will all have a good giggle. Really thrilled to be part of this crazy group and so pleased to see the 600 milestone get smashed!  So on the topic of desks, here is mine ... You know all those Christmas elements I stamped, coloured and fussy cut. I didn't use a single one on my cards. What a plonker! Decided to pop one inside each card instead as an extra detail. So my cards are finally finished and now to write them all out. Then onto making some little boxes for bath bombs I am gifting to a few friends. So the hounds, they both got bought a coat the other day, as its getting chilly. They look awfully posh now and seem to enjoy having them on too!  Since its Lyr...

Grungy - Halloween series #8

Image
 Good Afternoon all! So today I'm sharing a Halloween card I made using some bits I had extra of or were lying around. I searched in my background pages drawer and came across this dark, grunge effect sheet. This was made using water with some distress inks and smearing the colour on against my glass mat. Then from a recent Indigoblu magazine, I selected a stamp that matches the effect I was going for. I stamped it using Versafine onyx black ink.  From some stamped and coloured images I made in advance, I fussy cut some leaf clusters. Seperating each leaf, I arranged them on the opposite corner to the stamping. These leaves were coloured using Zig Kuretake clean colour real brush markers.  I adhered my leaves using collall glue, I chose to make them have the appearance of falling. Finally I backed this topper onto deep Aubergine Cardstock leaving a small border. If you wished to, a small halloween sentiment could be heat embossed on the right side of the card also.  ...

Halloween series #6 - Spooky mail

Image
 Morning friends!  This morning I want to share this card with you. As with the last post, this background was made using a Gel press.  I cut a thin panel out of this background, I then embossed it using a Leaf vine die from Crafters Companion. I did this twice, so the panel was all embossed. I have this adorable stamp and coordinating die set from AlteNew called Snail mail. With my Distress Oxide inks, I stamped out the image in greens and oranges. Next die cut each cute envelope and stamped the heart image in black ink on the top flap, of the envelope image. I applied a generous amount of Glossy accents to each heart and left to dry overnight.  In the morning, using collall glue I mat and layered the panel to plain black card stock, then onto a white card base. Thank you for spending some of your day with me! Ellie x Products: Altenew snail mail stamp Glossy accents Distress oxide ink pads Versafine black ink

Halloween series #5 - Gel press background

Image
 Evening friends, So tonight I want to share a card that has a more neutral design. This could certainly be given as a Halloween card though. All of these cards I've created can be altered as you wish to, if you would like to make them more spooky. This background I created using a gel press. I applied Pebeo acrylic paints and moved them around using a brayer. Once dry, I trimmed the background down and backed onto black card stock. I dived into my vast collection of patterned papers and found this cute toadstool print. Using my lawn fawn stitched circle dies, I cut out a circle that would fit nicely onto my background.  The left over black plain card stock, I die cut the Olive tree die from Joanna sheen, also the little star cluster die from Lawn Fawn. To add a little extra sparkle, I brushed over the die cut images with my Wink of stella pen. I adhered these elements to the circle, then the circle foam taped to the background for some extra dimension. To complete the card, t...

Halloween series #3 - No Halloween stamps

Image
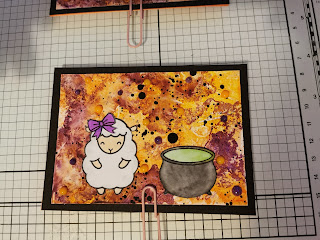
  Hello friends, I hope you are all having a good Thursday!! So I've finally got round to making a card, using the background from the previous blog post. First I grabbed the Lawn Fawn Baah Humbug stamp set, I selected the standing sheep stamp. I stamped it using Archival Jet black ink and coloured three sheep. Also from that set I used the bow stamp twice and coloured both purple. All colouring I did for these card, I used my Kuretake clean colour - real brush markers. Since I don't own any Halloween stamps, I had a rummage in my collection. I found an adorable stamp set by Heffy Doodle called Lucky friends, in this set is a pot of gold. I thought this would make a perfect cauldron, again I stamped two and coloured with my markers. After colouring and fussy cutting my images I glued a black card stock piece to cover the card base. Then I sliced my patterned background in half, I ensured each piece had a small border of the black card showing. I adhered all the card stock and i...

Halloween series #2 - backgrounds

Image
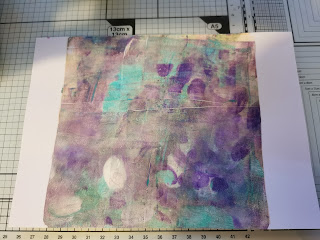
  Good Morning crafty friends!! So today we aren't making a completed card, I wanted to share a couple of backgrounds I made with you all. So to start I created both these backgrounds in the same way, just with different colours. These backgrounds are on Clarity Stamp A6 coated card, I made these using a mixed media plate by Nellie's Craft.  I placed the A5 piece of card on a piece of scrap card stock to minimise mess as much as possible. Next I grabbed my Gansai Tambi watercolours - 36 colour set. These are beautiful watercolours and if you are in the market for some then I would certainly recommend them. To start I applied some orange watercolour to the mix media plate , nothing neat or tidy, just sploshes of it here and there. I then carefully flipped the plate over and pressed it onto the card. I used my fingers to press the plate against the card and move the colour around. I repeated this step a second time then did this again with some purple watercolour. Its important ...

Happy Monday Friends! - Halloween series #1

Image
  Good Morning lovely friends! I hope you all have a fantastic start to the week, I have a week off which i plan to thoroughly enjoy and do lots of crafting! Today I wanted to talk Halloween and share some crafty Halloween bits I have been doing. I have always enjoyed All Hallows Eve, the history of it and the magical feel that night has. Now I get to enjoy it further my creating spooky makes that are great fun! Yesterday I began the tedious but necessary task of clearing up my craft desk. Then got crafty... So to begin my Halloween crafts series, I thought I would start with a simple card.  First I used two distress inks, Carved pumpkin and crushed olive to make my background. I used a wet paintbrush and applied the green ink first followed by the orange to create a watercolour effect. Next using a garnet ink from Artistry inks with a stencil from Clarity Stamp. The stencil is called a 7x7 Art stencil and is a grungy frame effect. I applied the ink using an ink blending brush...